
ACM COMPASS aims to ensure that its meetings, communications, and other activities including documents, papers, and publications shall be accessible to any and all persons, and will make every reasonable effort to accommodate their needs for attendance and participation.
This document includes steps you as an author can take to ensure your documents are accessible in Word and PDF formats. This is to ensure that papers or posters are readable by reviewers and the whole world once it’s published.
These instructions are based on the SIGACCESS Guides for creating Accessible PDFs in Word and Adobe Acrobat, and are modified to represent the new ACM process being used for COMPASS 2021.
Creating Accessible Papers with Microsoft Word
Even though you’ll be submitting a PDF, you still need to ensure that the formatting of your MS Word document is accessible first. To do this we’ve put together a few basics for you. Completing them all makes it not only easier for the reviews, but also for you once it’s time for camera ready!
- Use built-in Word themes and templates.
These ensure screen readers can identify headers from paragraph text and some other things. - Use Word’s built-in font formatting:
- Fonts: Word has built-in font styles (for instance, “Heading 1” or “Normal”). These can be accessed using the style ribbon or through the context menu (right-click with the mouse or use the keyboard command).

- Fonts: Word has built-in font styles (for instance, “Heading 1” or “Normal”). These can be accessed using the style ribbon or through the context menu (right-click with the mouse or use the keyboard command).
-
- Columns: Use the provided ACM Word template we provided if possible. The ACM format is 2 columns and should remain unchanged but if you prefer to change while editing you can do so by going to the “Page Layout tab”, selecting the Column dropdown menu, then the number of columns desired.

- Columns: Use the provided ACM Word template we provided if possible. The ACM format is 2 columns and should remain unchanged but if you prefer to change while editing you can do so by going to the “Page Layout tab”, selecting the Column dropdown menu, then the number of columns desired.
-
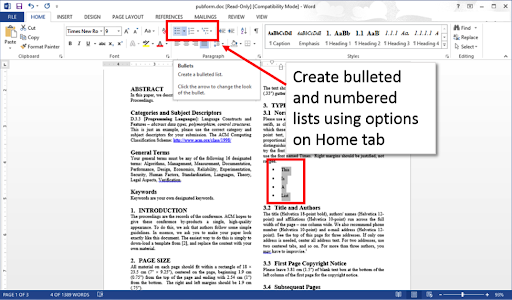
- Lists: Ensure you’re using “Lists” where appropriate, even for references. You can do this in the Home tab and Paragraph section or through the context menu.
- Lists: Ensure you’re using “Lists” where appropriate, even for references. You can do this in the Home tab and Paragraph section or through the context menu.
- Title and Language: Set your document title and language so people using screen readers are able to translate appropriately if needed.
- To set the title: Navigate to the File tab and look for Page Info. Under properties you will find Title. Update it with your paper title.
- To set the language: Navigate to the Review tab. Select the Language dropdown, then Set Proofing Language. Select English in the Language menu pop-up.
- Alternative text for image: Add alternative text to any figure. This is very important for those of us who are visually impaired. You need to describe what is in the image to someone who can’t see it without repeating what is already in the caption. This will be spoken using screen readers for people who cannot see the figure or have a difficult time understanding it. You can do this by:
- Opening the context menu and select the Format Picture menu option.
- In the Format Picture menu, navigate to the Layout & Properties tab.
- Open the Alt Text (alternative text) options.

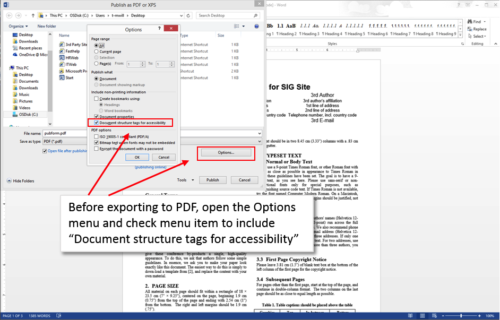
- Export as an accessible PDF: MS Word has a great feature to help you make an accessible PDF. You can do so as follows:
- Navigate to File tab.
- Select Export menu item.
- Select Create PDF Document.
- In Publish as PDF select the Options button.
- In the Options menu, check the menu item ‘Document structure tags for accessibility’. Then click Export to begin creating the PDF.
Note: You may also wish to use the MS Office Accessibility Checker to highlight errors you may not be aware of, and as a final check before creating the PDF. This tool works for MS Word on both Windows and Mac.
Accessible PDF Author Guide
For details on how to use Adobe Acrobat Pro XI to ensure your PDFs are accessible, please follow the detailed SIGACCESS Guide to producing accessible PDFs.
Steps include:
- Checking fonts are embedded
- Setting the title and language
- Adding tags
- Adding alternative text for figures
- Setting tab order
- Marking table headers
You may also wish to explore the cool Adobe Acrobat Pro Accessibility feature to find and fix all accessibility issues. Note this may be difficult to follow, but knowing your errors is the first step to fixing them! Reach out to us if you have questions.
Creating Accessible LaTeX
Unfortunately, there are no features in Latex that directly support making accessible PDFs. However, some tips include:
- Ensure all figures have an up-to-date figure description in the source. You can add the following script with a detailed description after your caption to allow blind people to better understand the content:
- Description[A float image]{ }
- Ensure the paper metadata is set.
Final Accessibility Check
Well done on making it this far! However, make sure to do an accessibility check before you submit for review, and again before the camera-ready submission. Using the new LaTeX and Word templates from ACM produce an accessible HTML version of your submission, but do not actually produce an accessible PDF. If you have followed all the content described above, this will help us finalize your paper for publication much faster. Following these guides will also help:
- The CHI community produced a simple guide of how to finalize your accessibility check for your PDF document.
- Adobe have provided a complete and more complex tutorial on how to use the Adobe Acrobat Accessibility feature to find and fix all accessibility issues.
Our submissions team, lead by Ebtisam, is responsible for checking the accessibility of your final submission prior to publication. They highly appreciate the time you take to implement the basics we’ve covered on this page. If you have any questions or concerns about creating accessible content, please contact the Accessibility Chairs at accessibility@compass.acm.org.
Additional Resources
- SIGACCESS Guidance on Describing Figures
- SIGACCESS guidelines on making an accessible ACM Conference paper
- SIGACCESS guidelines on creating accessible PDFs in Microsoft Word
- WebAIM guidelines on PDF accessibility
- WebAim Guidelines on Creating Accessible Word Documents
- PDF Techniques for WCAG 2.1
- Adobe’s resource center for PDF accessibility